|
|
|
[color=rgba(0, 0, 0, 0.85)]表情包特辑II:震惊修狗申请出战!Paddlehub制作一个简单的小表情 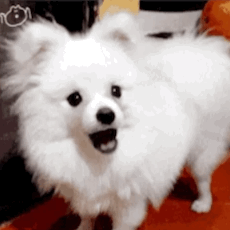
只因为在聊天群中多看了你一眼,直接把你“添加到表情”~
最近在聊天的时候看到的这只可爱的修勾勾,太爱了,决定为它写一个小项目~
做到上传一张带有人脸的图像,自动生成一张这种缩放+晃动的表情~
[color=rgba(0, 0, 0, 0.85)]如果你在运行项目时遇到paddlehub的问题
请更新一下paddlehub的版本,aistudio上的似乎有问题
执行 pip install --upgrade paddlehub
[color=rgba(0, 0, 0, 0.85)]其实想法非常简单,分两步就好了第一步:缩放1.1 通过Paddlehub中的人脸检测模型检测出人脸,确定缩放的中心点
1.2 确定缩放之前的范围和最终的范围
1.3 根据前面得到的条件,施行缩放 faceCutRes, _ = DU.dodet(faceCut)resf = []if faceCutRes is None: print("No Face Detected! EXIT!")else: top = int(faceCutRes['top']) right = int(faceCutRes['right']) left = int(faceCutRes['left']) bottom = int(faceCutRes['bottom']) w = int((right - left) * rratio) h = int((bottom - top) * 0.6) if w > h: resw = 260 resh = int(h * 260 / w) else: resw = int(w * 260 / h) resh = 260 cx = int((right + left) / 2) cy = int((bottom + top) / 2) left = int(cx - w/2) right = int(cx + w/2) top = int(cy - h/2) bottom = int(cy + h/2) scaleW = imgW / w scaleH = imgH / h if scaleW > scaleH: finalScale = scaleH else: finalScale = scaleW newW, newH = int(w * finalScale), int(h * finalScale) if scaleW > scaleH: newW_2 = int(newW/2) if cx > newW_2 and cx < imgW - newW_2 - 1: bleft = cx - newW_2 bright = cx + newW_2 elif cx < newW_2: bleft = 0 bright = newW else: bleft = imgW - newW - 1 bright = imgW - 1 btop = 0 bbottom = imgH else: newH_2 = int(newH/2) if cy > newH_2 and cy < imgH - newH_2 - 1: btop = cy - newH_2 bbottom = cy + newH_2 elif cy < newH_2: btop = 0 bbottom = newH else: btop = imgH - newH - 1 bbottom = imgH - 1 bleft = 0 bright = imgW topi = np.linspace(0, top-btop, resizeFrame); bottomi = np.linspace(0, bbottom - bottom, resizeFrame); lefti = np.linspace(0, left-bleft, resizeFrame); righti = np.linspace(0, bright-right, resizeFrame); for rf in range(resizeFrame)[::-1]: timg = faceCut[int(top - topi[rf]):int(bottom + bottomi[rf]), int(left - lefti[rf]):int(right + righti[rf])] resf.append(Image.fromarray(cv2.cvtColor(cv2.resize(timg, (resw, resh)), cv2.COLOR_BGR2RGB)))
[color=rgba(0, 0, 0, 0.85)]上面的DU是对PaddleHub人脸检测模型的简单封装,其实是二仙桥项目里直接copy过来的
其实不仅仅是可以用于现在这种单帧的图像,封装后还是会增加一点tracking的相关先验以满足二仙桥这种需求
代码放在这里 class detUtils(): def __init__(self): super(detUtils, self).__init__() self.lastres = None self.module = hub.Module(name="ultra_light_fast_generic_face_detector_1mb_320") def distance(self, a, b): return math.sqrt(math.pow(a[0]-b[0], 2) + math.pow(a[1]-b[1], 2)) def iou(self, bbox1, bbox2): b1left = bbox1['left'] b1right = bbox1['right'] b1top = bbox1['top'] b1bottom = bbox1['bottom'] b2left = bbox2['left'] b2right = bbox2['right'] b2top = bbox2['top'] b2bottom = bbox2['bottom'] area1 = (b1bottom - b1top) * (b1right - b1left) area2 = (b2bottom - b2top) * (b2right - b2left) w = min(b1right, b2right) - max(b1left, b2left) h = min(b1bottom, b2bottom) - max(b1top, b2top) dis = self.distance([(b1left+b1right)/2, (b1bottom+b1top)/2],[(b2left+b2right)/2, (b2bottom+b2top)/2]) if w <= 0 or h <= 0: return 0, dis iou = w * h / (area1 + area2 - w * h) return iou, dis def dodet(self, frame): result = self.module.face_detection(images=[frame], use_gpu=False) result = result[0]['data'] if isinstance(result, list): if len(result) == 0: return None, None if len(result) > 1: if self.lastres is not None: maxiou = -float('inf') maxi = 0 mind = float('inf') mini = 0 for index in range(len(result)): tiou, td = self.iou(self.lastres, result[index]) if tiou > maxiou: maxi = index maxiou = tiou if td < mind: mind = td mini = index if tiou == 0: return result[mini], result else: return result[maxi], result else: self.lastres = result[0] return result[0], result else: self.lastres = result[0] return result[0], result else: return None, None
[color=rgba(0, 0, 0, 0.85)]第二步:随机旋转加平移这部分我当时还看了一点前处理的相关代码
咳,太久不写了,啥都忘了要,抓紧复习一波
其实主要就是让图像围绕着旋转点旋转一个很小的角度,以及平移一个很小的角度
再直接通过下标的方式,截取我们需要的部分。 def Rotate(img, imgw, imgh, cx, cy, angle=3): new_H = int(imgw * fabs(sin(radians(angle))) + imgh * fabs(cos(radians(angle)))) new_W = int(imgh * fabs(sin(radians(angle))) + imgw * fabs(cos(radians(angle)))) M = cv2.getRotationMatrix2D((cx, cy), angle, 1) # M[0, 2] += (new_W - imgw) / 2 # M[1, 2] += (new_H - imgh) / 2 res = cv2.warpAffine(img, M, (new_W, new_H), borderMode=cv2.BORDER_REFLECT) return resfor i in range(10): res = Rotate(faceCut, imgW, imgH, cx, cy, angle=random.randint(-7, 7)) w_10 = int(w / 20) h_10 = int(h / 20) bx = random.randint(w_10-3, w_10) * (-1 if random.randint(0, 1) else 1) by = random.randint(h_10-3, h_10) * (-1 if random.randint(0, 1) else 1) res = cv2.copyMakeBorder(res, h_10, h_10, w_10, w_10, cv2.BORDER_REFLECT) timg = res[top + by + h_10:bottom + by + h_10, left + bx + w_10:right + bx + w_10] resf.append(Image.fromarray(cv2.cvtColor(cv2.resize(timg, (resw, resh)), cv2.COLOR_BGR2RGB)))
[color=rgba(0, 0, 0, 0.85)]使用非常简单直接通过face参数执行要处理的图片path python shakerdog.py --face xxx.png如果想指定输出的文件名字,则 python shakerdog.py --face xxx.png --filename yyy.gif会生成一个和yyy.gif的动图
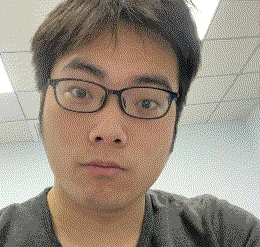
[color=rgba(0, 0, 0, 0.85)]In [1]
!python shakerdog.py --face me2.jpeg
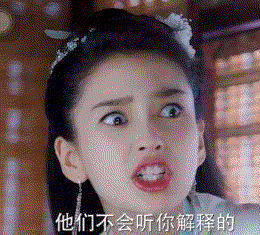
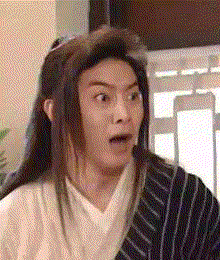
[color=rgba(0, 0, 0, 0.85)]下面有请为艺术献身的艺术家们登场!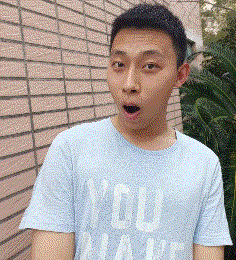 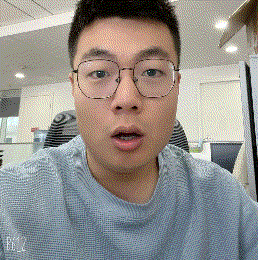
 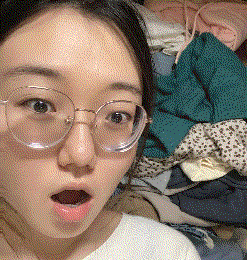
 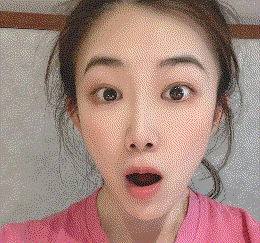
以及表情包二创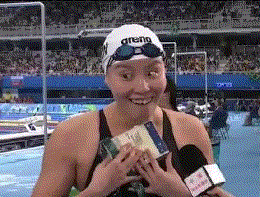


[color=rgba(0, 0, 0, 0.85)]总结这个项目主要分为两部分
一个是人脸检测的部分,另外是一些简单的图像处理部分
通过图像处理部分也可以复习一下网络的前处理中的缩放技巧哈哈
同时又能收获一枚定制的表情,真是开心嘿嘿
顺便求一下fork啦~下次再见~
[color=rgba(0, 0, 0, 0.85)]个人简介百度飞桨开发者技术专家 PPDE
飞桨上海领航团团长
百度飞桨官方帮帮团、答疑团成员
国立清华大学18届硕士
以前不懂事,现在只想搞钱~欢迎一起搞哈哈哈
我在AI Studio上获得至尊等级,点亮10个徽章,来互关呀!!!
https://aistudio.baidu.com/aistudio/personalcenter/thirdview/311006 B站ID: 玖尾妖熊
[color=rgba(0, 0, 0, 0.85)]其他趣味项目:使用关键点检测,开启一道传送门吧~这种触电的感觉是......结合关键点变身皮卡丘~继承火的意志,结合关键点检测玩个火吧~Padoodle: 使用人体关键点检测让涂鸦小人动起来使用关键点检测和分类模型改造体感愤怒的小鸟利用PaddleHub制作"王大陆"滤镜利用Paddlehub制作端午节体感小游戏熊猫头表情生成器[Wechaty+Paddlehub]如何变身超级赛亚人(一)--帅气的发型【AI创造营】是极客就坚持一百秒?在Aistudio,每个人都可以是影流之主[飞桨PaddleSeg]愣着干嘛?快来使用DQN划船啊利用PaddleSeg偷天换日~
原贴地址:https://aistudio.baidu.com/aistu ... ype=0&channel=0
|
|
 |Archiver|手机版|小黑屋|同和创作矩阵
( 粤ICP备20019636号-1 )
|Archiver|手机版|小黑屋|同和创作矩阵
( 粤ICP备20019636号-1 )


 发表于 2022-5-23 14:20:15